![]()
|
|
|
|
VOLUME NINE-------------MARCH 2003 WITH THE OL' MISSOURI HILLBILLY
February has come and gone, and still not much winter weather. El Niño still doing her thing I guess. As I write this, the weatherman is saying we may have a winter storm with lots of snow in the higher altitudes over the next few days. I just hope higher altitude don’t mean “here on my driveway!” I’ve spent some time workin’ on my reloading room the last few weeks. Since I don’t have the luxury of unlimited space, the reloading area has to accommodate other projects so, I thought I’d share an idea that’s been workin’ really well for me. I have struggled with reloading tools bolted semi permanently to a work bench, tried to use tools clamped down with “C” clamps, and even used bags of shot to hold things in place. Of course, with a press or other tool bolted to the bench, it’s always in the way when you want to work on a project other than reloading, and “C” clamps and shot bags just don’t get it either! RCBS has a good idea with their accessory plate that fastens to a bench or table top, and has multiple threaded holes to quickly and easily bolt down (and remove) a number of their tools and “toys”. In fact, I have two of those and they work fine, except they are still a nuisance when you need a large flat surface where they happen to be screwed to the bench! I just took the idea a little further and made everything easy to install and remove from the work surface! My project started with an old throwaway computer table with heavy metal legs and frame and a pressed wood top. The top is about 1 ½ inches thick, with a formica type surface and measures 30 by 60 inches. The table sits about 3 inches lower than the height of a typical desk. I found this height about right for working from a swivel secretarial chair that I found on sale at Office Depot for under $20.00. Some scrounging in the bolt and screw aisle at the local Ace Hardware, turned up some brass sleeve anchors, that are threaded like a wood screw on the outside and have machine screw threads on the inside. I chose two sizes; one threaded inside for a #8 x 40 machine screw, and the other for a 5/16th inch bolt. The next step was to carefully mark and drill holes in the table top of the correct sizes for the anchors to screw into, and turn them in to a depth just below the surface of the table top. Success; My RCBS accessory plates now screw down with hardened #8 x 40 machine screws with Torx heads of the same size Leupold uses in their scope mounting screws. This handles the two presses, powder measure stands, and primer tool.
Here are the anchors for one of the RCBS Accessory Plates
Here is the other Accessory Plate mounted The case prep center and power case trimmer have their spots, anchored by 5/16th bolts with hex socket heads for easy installation and removal with the appropriate size allen wrenches.
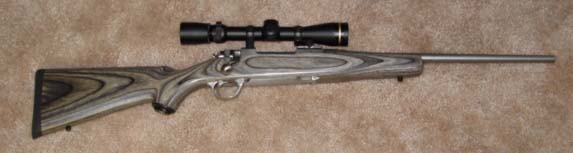
This is the table with the Case Prep Center in its place Any or all of these items can be installed or removed in a matter of minutes, leaving a flat, unobstructed work surface for other projects! If you would like more information or more detailed instructions about this project, just drop me an e mail and I’ll try to help. Since last month’s newsletter I have loaded some test loads for the Little Heifer’s .243. This is the Ruger M77 compact in stainless steel with a laminated stock.
A Little Ruger for a Little Heifer This is a sweet little rifle for a person of small stature, featuring a length of pull just under 12 inches, and a 16 ½ inch barrel. This is Ann’s varmit rifle, and we have only shot factory ammo in it so far. My test loads consist of Remington brass, Hornady 58 grain VMAX bullets, CCI 200 primers, and Hodgdon’s Varget powder. I usually load 3 rounds of each powder weight and work up in ½ grain increments as I approach the maximum load listed. My source for these loads is the Hornady Reloading Manual, Fifth Edition. My system for marking cases to track the different powder charge weights, is to paint the case heads with different colors of felt tipped markers and mark the loading notes accordingly. I use the, “permanent ink” markers because it doesn’t rub off easily, yet will quickly come clean with a little rubbing alcohol after firing. I wish I could say that this is an original idea, but I think I got it from an article by Jon Sundra in one of my magazines. Further details will follow after I have run these loads over the Shooting Chrony, and examined for pressure signs. I will be expecting 300 to 350 fps lower velocities from this 16 ½ inch barrel, as compared to a 24 or 26 incher. We are planning a trip to the Midwest this spring, and intend to use the .243 for some coyote medicine while there. Naw, Ann aint gonna have all the fun. I’m also ready to test some new loads for my .25-06 Ruger No. 1 so I can join in the excitment. The .25-06 loads are set up in Winchester cases using Hornady VMAX 75 grain bullets, CCI 200 primers, and Hodgdon’s H4350 powder. The data for these loads comes from Hodgdon’s Data Manual Number 27. More info to follow. Remember, for guns, components, and all your shooting needs, check out the Sportsman’s Warehouse. (www.sportsmanswarehouse.com) Well, It's time to shut down here, So . . . . 'Til next time, Keep 'em shootin' straight, shoot 'em often, and above all, BE SAFE!!!!! THE OL'
HILLBILLY |